Microsoft Entra ID OIDC Configuration
Pro onlyConfiguration in Microsoft Entra ID
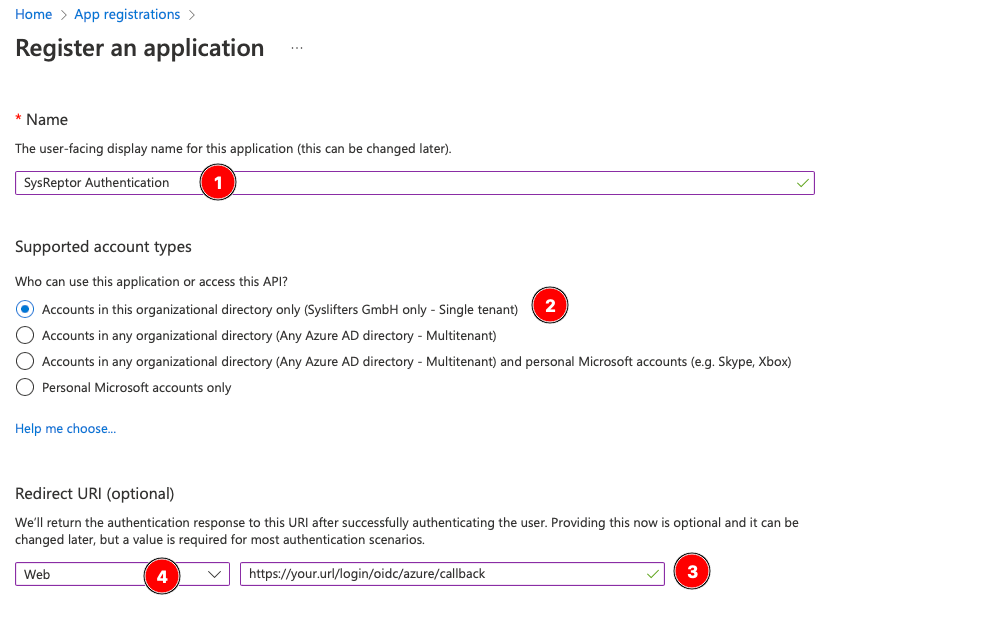
Select Applications -> App registrations -> New registration
In following menu:
- Enter a Name for your reference (1)
- Select the types of accounts who are allowed to login (2) - this is the first option "Single tenant" in most cases
- Enter the redirect url of your application in the following format: https://your.url/login/oidc/entra/callback (3)
- Select type "Web" for redirect url (4)
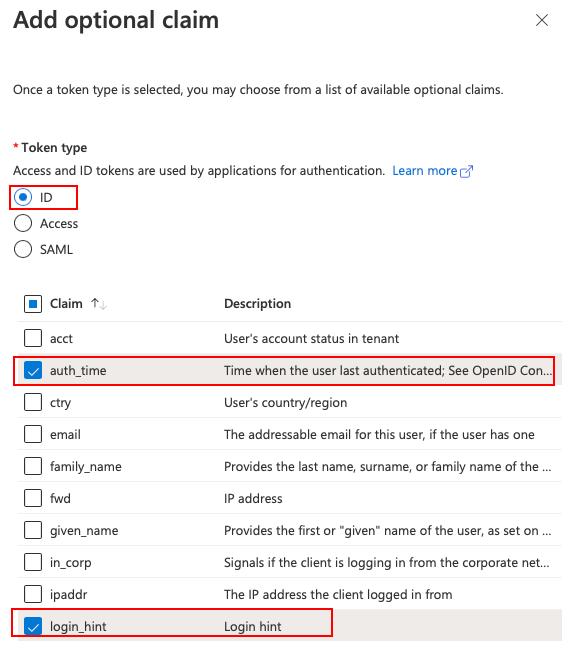
In the newly created "App registration", go to the Token configuration submenu and add the following optional claim:
- TokenType: ID
- Claims: auth_time, login_hint
Next go to the "Certificates & Secrets" submenu and add a new client secret with 24 months validity (this is the maximum) and any description.
Copy the value of the newly created secret and store it for later use.
Finally go to the "Overview" submenu and copy the values Application (client) ID and Directory (tenant) ID.
You should now have the following values:
- Client ID
- Client secret
- Entra tenant ID
SysReptor Configuration
Create your OIDC configuration for SysReptor...
{
    "entra": {
        "label": "Microsoft Entra ID",
        "client_id": "<entra client id>",
        "client_secret": "<entra client secret>",
        "server_metadata_url": "https://login.microsoftonline.com/<entra tenant id>/v2.0/.well-known/openid-configuration",
        "client_kwargs": {
            "scope": "openid email profile",
            "code_challenge_method": "S256"
        },
        "reauth_supported": true,
        "user_identifier_claim": "email",
        "require_email_verified": true
    }
}...and add it to your application settings (OIDC_AUTHLIB_OAUTH_CLIENTS).
The OIDC client needs to be able to establish a network connection to Microsoft Entra ID. Make sure to not block outgoing traffic.
Other JSON fields, user_identifier_claim, and general SSO limitations are covered in Generic OIDC configuration and Limitations.
Entra ID: email_verified
Some Entra ID configurations omit email_verified or return email_verified=false. See Verified Emails and adjust require_email_verified only if you understand the trade-off.